
 |
|
#1
|
||||
|
||||
|
After about 7-8 years of running an IHI VF28 (replacing the previous TD04) I thought it was about time I had a little upgrade.
I couldn't justify spending £850 - £1300+ on a new Turbo, so thought I would have a go at updating a used TD05. With the help of other fellow DIY'ers and YouTube I felt confident that this was a job worth tackling. When you break a turbo down into it's piece parts it makes even more sense, and I struggle to understand why Turbo chargers are so expensive. It's shocking to think that most dealers will replace a complete turbo when an oil seal fails !!!! I acquired an early 1993-1996 WRX TD05H 90 degree's turbo, for £58. This was sold as a good runner, and reported to have recently produced 287BHP. The plan for this is as follows : TD05 18G Front Entry Compressor Housing TD05 18G 11 Blade Billet Compressor wheel Porting (option, I need to look into this further) Full Overhaul Kit inc. New bearings and Seals New Water/Oil Kit TD05H (16G), 90 Degree Entry :   Disassemble in the following order, using : 19mm spanner, to remove Water Pipes 10mm Socket, to remove Oil Drain Pipe Small screwdriver to remove Wastegate Circlip 12mm Socket, to remove Actuator 10mm Socket, to remove Turbo clamp/band Hide Hammer or Plastic Hammer, to remove Exhaust Housing from Turbo Cartridge Large Circlip pliers (or long nose pliers), to remove Compressor Housing Circlip You will then have the following :  Turbo Cartridge :  Checking Shaft Play / End Float : Ignore the scratching sound in these video's when the turbo is spun. That is just the Exhaust Turbine wheel catching on a cover that floats loose once the housings are split. Removal of Compressor Wheel : 10mm Multi-point socket 12mm Multi-point socket Note : The shaft may be a Clockwise or Anti-Clockwise thread, so take care when loosening  Another check of the Shaft Play / End Float Considering the potential age of this turbo it doesn't look too bad. It could probably be left alone, but for the sake of $59 for a overhaul kit, it's worth rebuilding Holding the Turbine wheel and giving a slight tug will release the whole wheel/shaft assembly. Here you can see one of the bearings which is quite a simple brass sleeve with oil holes through it  Compressor wheel cleaned and weighed (50g), to compare against the 18G when it arrives. Oliver has now nicked this for his Bedroom, for his shelf of shiny car part !!!!!!  That's it for the moment. The cartridge will remain in one piece until the overhaul kit arrive In the meantime I hope to get the Exhaust housing bead blasted at work. (To be Continued) |
|
#2
|
||||
|
||||
|
looks relatively easy job

|
|
#3
|
||||
|
||||
|
Built a few over the years , bearing changes very simple
__________________
Eat, Sleep, Race , Repeat |
|
#4
|
||||
|
||||
|
Let's hope so. Watched a few YouTube video's and looks straight forward.
I can't believe how little is in there and the price of parts. I initially thought the kit would be bearings and seals, but it contains everything except the turbine shaft. What's your opinion on the play on the shaft in those clips ? |
|
#5
|
||||
|
||||
|
Doesn't seem to bad oil is the bearing at the end of the day but some exess movement .
__________________
Eat, Sleep, Race , Repeat |
|
#6
|
||||
|
||||
|
Liking this little thread .
__________________
Maintained by Hypertech and Mapped by Andy Forrest 1998 UK Turbo , 1998 Terzo , 1997 JDM Type R the money pit , 2004 black WRX STI Type UK , 2004 blue FSTI |
|
#7
|
||||
|
||||
|
Just ordered :
18G/20G Compressor Housing 18G 11 Blade Billet Wheel Oil & Water pipes kit Overhaul Kit Lets see how long it take to arrive from Japan. |
|
#8
|
||||
|
||||
|
I bet it is quicker than Culverwells can get spring clip with a nut
__________________
Keep it on the black stuff and leave the pit boards alone |
|
#9
|
||||
|
||||
|
Haha very true!
__________________
all over it jaffa style!!! |
|
#10
|
||||
|
||||
|
Great thread mate, just wondering about the whole balancing proceedure
|
|
#11
|
||||
|
||||
|
Quote:
Besides the Kamak/Kinugawa comes pre-balanced. All the parts are individually balanced, so they should be pretty close. However, according to providers of balancing services !!!!! there can be a tolerance build up on the compressor side (they quote that the Turbine side is not effected on an assembled CHRA). This can be corrected by small amounts of grinding of either the Compressor wheel or Shaft nut. But this seems to be more of a fine tuning exercise mainly provided to Turbo Charger rebuild/re-manufacturer companies, to ensure that any tolerance stack-up doesn't cause the Turbo to fail prematurely. I read this as a service that provides confidence that the rebuild will outlast the warranty period that the company supplying the rebuilt/re-manufactured turbo may provide. Besides any turbo with the slightest nick/bent fin on the compressor will be un-balanced to probably a great degree. I have found a company offering the service for £50, and have also emailed Turbo Dynamics for a quote. I would be interested in other peoples view's, especially those that have rebuilt DIY style before. |
|
#12
|
||||
|
||||
|
Quote:
|
|
#13
|
||||
|
||||
|
I've been looking into the balancing issue, and have also had correspondence with Kamak/Kinugawa who recommend an assembly balance.
There are 2 types of balancing : 1. Rotor Assembly Balancing (Turbine Wheel/Shaft, Compressor Wheel & Shaft Nut) 2. Fully Assembled CHRA Balance The disadvantage of Method 1 is that it has to be disassembled to refit it into the CHRA (Cartridge). It also does not include balance with bearings or oil seals (which are like metal circlips). Therefore it is not as accurate as the full CHRA balance. Turbo Dynamics only balance as part of a full Inspection Service, starting at £195+VAT subject to the results of the inspection. Other balancing services are available online. I have located a Method 1 service for £50 and a Method 2 service for £39 + £12 postage. So I think I will go with Method 2. Method 2 doesn't require disassemble after balance, just needs the Exhaust Housing and Compressor Housing bolted back on. The machines used vary from large lathe type machines, to bench top soft bearing balancing machines. All normally come with before & after results. |
|
#14
|
||||
|
||||
|
Upgrade parts arrived from Kamak/Kinugawa
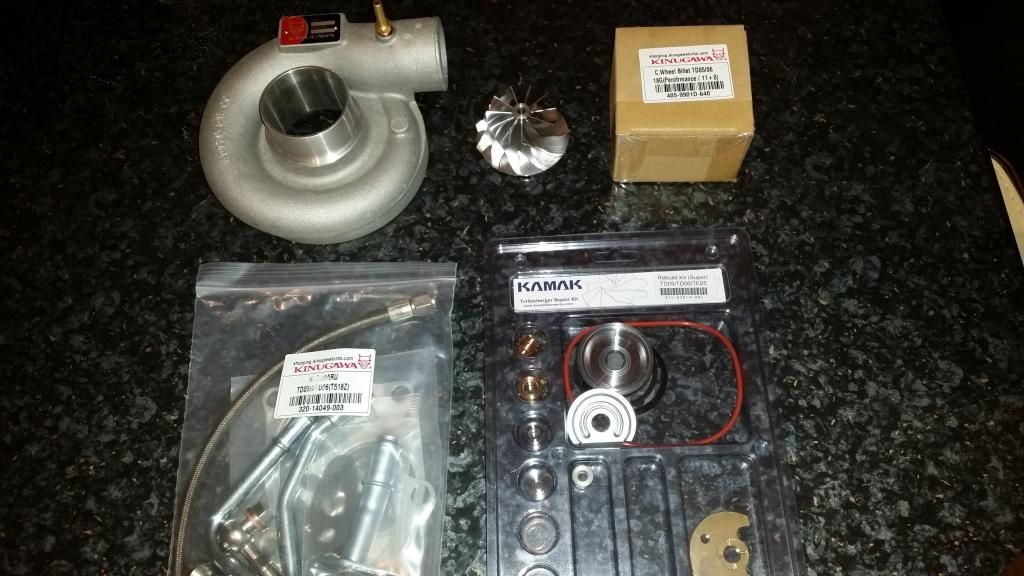 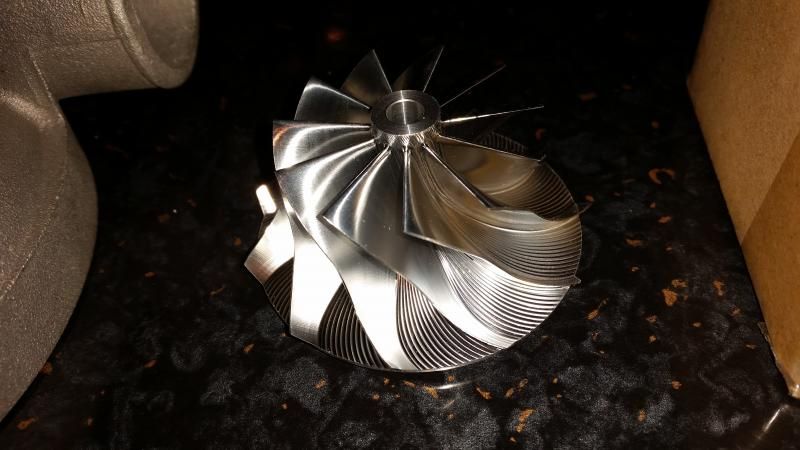 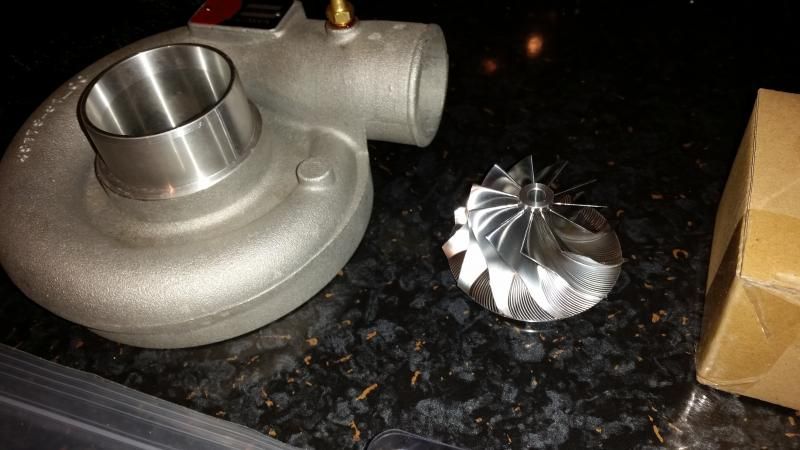 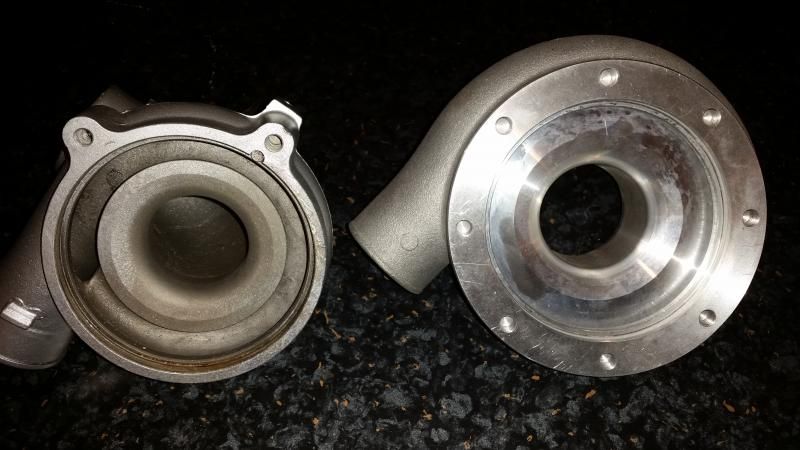 I need to talk with Kinugawa about the compressor housing. They appear to supply 2 types : Type 1 : 2.21inch inlet, direct replacement with Subaru specific actuator mounting webbing. (Actuator mounting web's shown above on the original TD05 housing) http://shopping.kinugawaturbo.com/tu...td0618g-1.aspx Type 2 : 2.4inch inlet with different actuator mountings. The standard actuator doesn't line up with the holes or clear the housing. http://shopping.kinugawaturbo.com/tu...-1wheel-1.aspx Kinugawa use this housing if you purchase a full turbo. I received the 2nd item, under the advise of Kinugawa, which means my actuator won't fit. However, the 11 blade billet may not fit in the slightly smaller 2.21inch Subaru specific housing, so I may have to go for an upgraded actuator. |
|
#15
|
||||
|
||||
|
If you are going for an upgrade actuator Scott how about a nice forge actuator.
__________________
Maintained by Hypertech and Mapped by Andy Forrest 1998 UK Turbo , 1998 Terzo , 1997 JDM Type R the money pit , 2004 black WRX STI Type UK , 2004 blue FSTI |
|
#16
|
||||
|
||||
|
Quote:
It would fit will a small amount of fabrication, which would also allow the standard actuator to fit. But I may aswell stick with Kinugawa, and one of these : 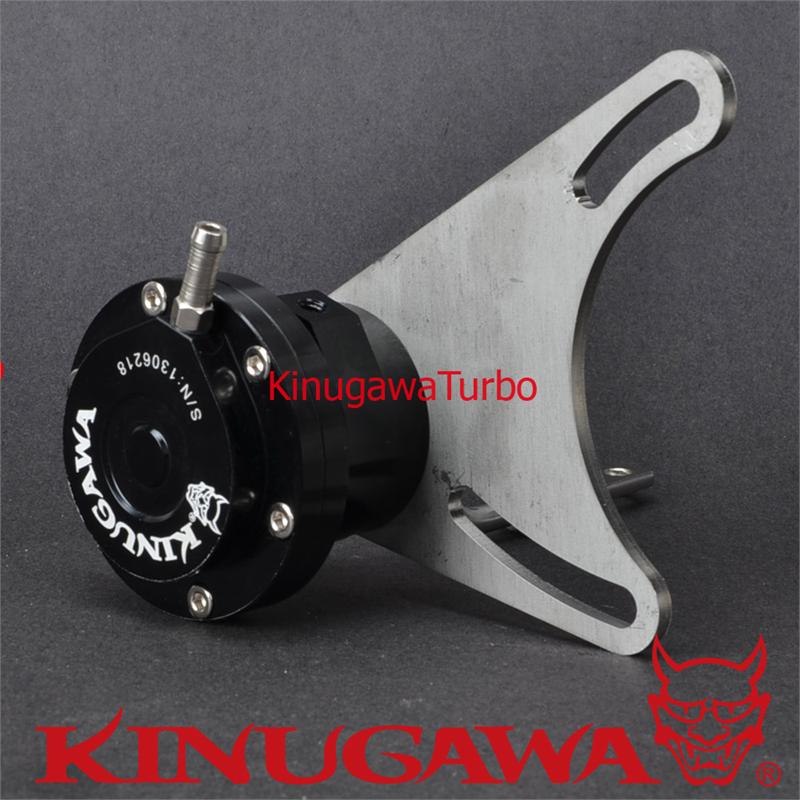
|
|
#17
|
||||
|
||||
|
Slow progress, but a little.
Still talking with Kinugawa about Compressor Housing/Actuator situation. Last email seemed to sound like a 'New' Adjustable Actuator was being sent FOC, due to the cost to return the compressor being close to the price of the Actuator. Hopefully should get an email soon confirming shipment. Spent a bit of time today wire brushing the exhaust housing. It took a little longer then expected as I also had to fit new studs, two of which needed re-tapping due to being damaged by the previous owner on extraction. The photo's show it a little wet. This is just damp left from a good old going over with a baby wipe to remove the rusty dusty........ 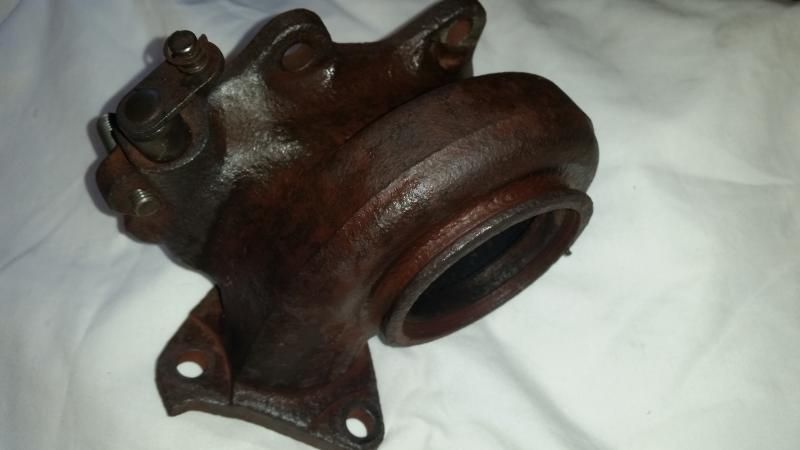 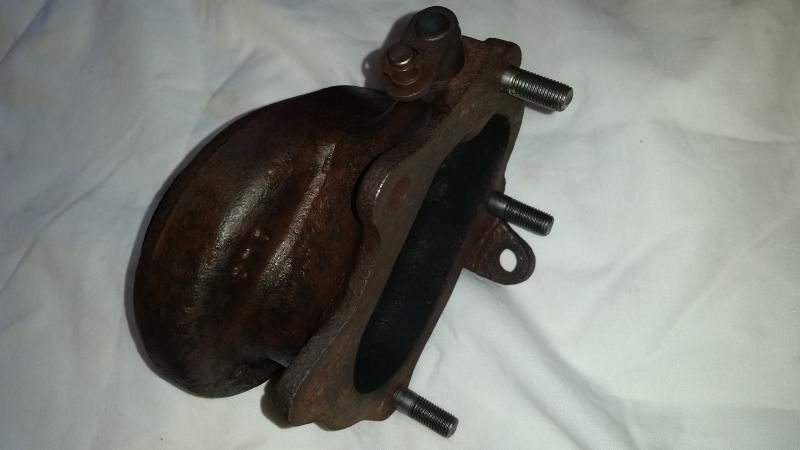
|
|
#18
|
||||
|
||||
|
Well I got the bearing housing/cartridge all built up today, then realised the 18G Billet doesn't fit..........
When fitted and the shaft nut lightly tightened the wheel makes contact with the bearing housing/cartridge. This wheel was provided by dealing direct with Kinugawa staff (not just picked off the website), as I was offered the 11-Blade or a 5+5 blade. To me it looks like the profile of the base of the compressor wheel does not give enough clearance due to the larger 18G size of the wheel. Billet Wheel fitted, showing contact with bearing housing/cartridge and shaft nut right on tip of shaft :  Original 16G wheel fitted, no contact and spins up fine : 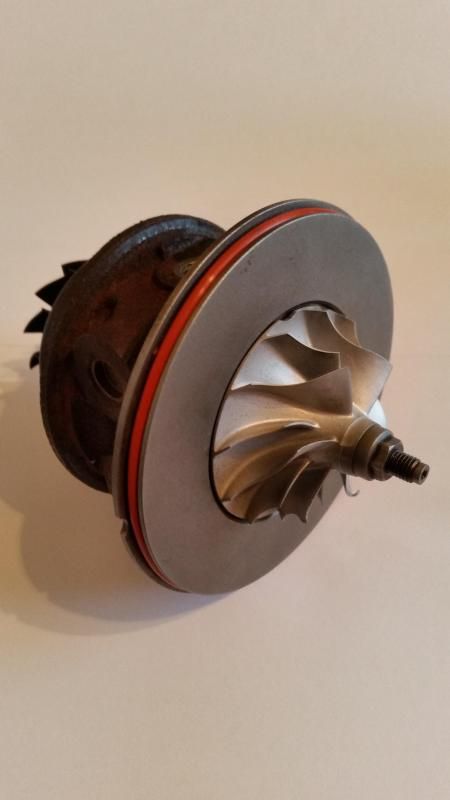 Head scratching required, followed by another email to Kinugawa. Whilst that goes through the interweb to Japan I did a bit of research (it's much more fun doing it after the event). It turns out that the bearing housing needs to be machined to accept an 18G wheel DOH !!!!!!!!. A chat with the is now Bro-in-law required regarding his lathe and 4-jaw chuck......or if anyone on here can help |
|
#19
|
||||
|
||||
|
When I did mine 9 years ago used a drill in a vice put a bolt though the hole and span it up on low speed . Then filed away un needed material
__________________
Eat, Sleep, Race , Repeat |
|
#20
|
||||
|
||||
|
I was thinking dremmel, as it doesn't have to be accurate just for clearance. Bro-in-law is on the case, just about to email him pictures.
|
|
#21
|
||||
|
||||
|
|
|
#22
|
||||
|
||||
|
The joys of having a mechanical engineer in the family, can't be much going through the machine shop now, what other work is Andy taking on.
|
|
#23
|
||||
|
||||
|
Andy didn't do it as he can't run the cnc.
Mark W sorted it. |
|
#24
|
||||
|
||||
|
Any updates on this Scott .
__________________
Maintained by Hypertech and Mapped by Andy Forrest 1998 UK Turbo , 1998 Terzo , 1997 JDM Type R the money pit , 2004 black WRX STI Type UK , 2004 blue FSTI |
 |
| Currently Active Users Viewing This Thread: 1 (0 members and 1 guests) | |
|
|